Uploading files in ASP.NET is simple and easy as I have explained in my article Uploading Images to the Server's Folder. The thing about uploading is that you can upload one file at a time which is pretty painful if you have 100 files to upload. In this article we will see how to upload all the files in a particular folder. The technique which we are going to use here is not PERFECT but does perform the operation to some extent.
Uploading files in ASP.NET is simple and easy as I have explained in my article Uploading Images to the Server's Folder. The thing about uploading is that you can upload one file at a time which is pretty painful if you have 100 files to upload. In this article we will see how to upload all the files in a particular folder. The technique which we are going to use here is not PERFECT but does perform the operation to some extent.
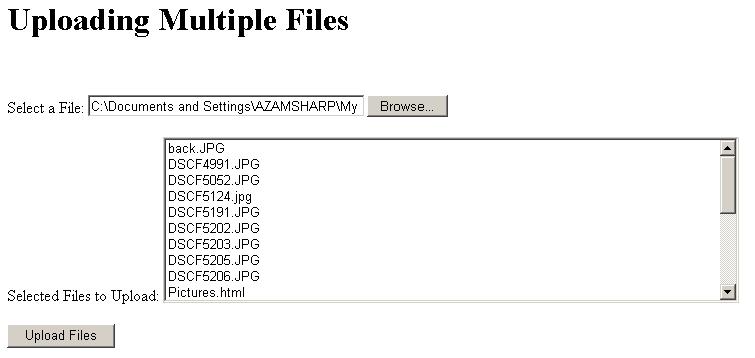
User Interface:
User Interface is pretty simple which consists of ListBox and the HTML File Field control. Take a look at the screen shot below:
So what's the catch?
Good question! ASP.NET File Field control can only be used to select files and that's what its supposed to do. So in order to get all the files of a particular folder you need to select a file from that folder. This means that if you have a folder name Exams and it has two files Test1.zip and Test2.zip than you need to select one of the zip files in order to upload all the files from the Exams folder.
What about if I don't want one of the files in the folder to be uploaded?
There are several work around to this problem.
So, now you know what we are up to let's get this party started.
Here is the Upload Files Button click Code:
| private void Button1_Click(object sender, System.EventArgs e)
{ ArrayList fileList = new ArrayList(); string dirNameWithPath = System.IO.Path.GetDirectoryName(File1.PostedFile.FileName); // Get the files in the Directory string[] files = Directory.GetFiles(dirNameWithPath); foreach(string str in files) { // Add into the ArrayList fileList.Add(System.IO.Path.GetFileName(str)); } // Bind to the ListBox ListBox1.DataSource = fileList; ListBox1.DataBind(); // Run a loop and upload the files foreach(string str in fileList) { File1.PostedFile.SaveAs(SERVER_FOLDER+System.IO.Path.GetFileName(str)); } } |
First we made an ArrayList so that we can bind it to the ListBox control and the user can see the uploaded files. Than we get the directory name and the path of the directory in which the files to upload belong. After that we get the files in the directory and store them in the string array. Than we ran a foreach loop and simply add all the files to the ArrayList. Than we assign the ArrayList to the ListBox control. And finally we run a foreach loop and upload all the files to the server's folder.
SERVER_FOLDER is just a constant which is the path to the server's folder.
| private const string SERVER_FOLDER = @"C:\ServerFolder\"; |
You might see an error saying that you don't have permission to access the ServerFolder in this case just give ASPNET account permission to access the ServerFolder.
If everything goes well than you will see all the uploaded files in the folder.
I hope you liked the article, happy coding!