Asp.net 2.0 is coming at us at a very fast pace. I have to admit that Asp.net 2.0 is very different from Asp.net 1.x. From now on most of the articles that you will see on this site will target Asp.net 2.0. In this article I will look into the Menu control. We will look into populating the menu control using different sources.
Introduction:
Asp.net 2.0 is coming at us at a very fast pace. I have to admit that Asp.net 2.0 is very different from Asp.net 1.x. From now on most of the articles that you will see on this site will target Asp.net 2.0. In this article I will look into the Menu control. We will look into populating the menu control using different sources.
What is a Menu Control?
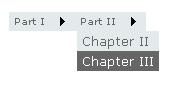
Menu control is used to display menus. The menu can be displayed vertically or horizontally. Below are the two screenshots showing vertical and horizontal menus.
Horizontal Menu:
Vertical Menu:
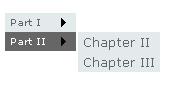
For making menu change the orientation you just need to change the Orientation property of the Menu control to horizontal or vertical.
Now let's see different approaches to populate the menu control.
Populating the menu using SiteMapDataSource:
This is the preferred way of populating the menu control. SiteMapDataSource allows you to read the information from the .sitemap file which is simply an xml file. Let's take a look at the .sitemap file. As you can see the file below all you need to do is to assign the values to the nodes and that's it.
| <?xml version="1.0" encoding="utf-8" ?>
<siteMap> <siteMapNode url="Default.aspx" title="Home"> <siteMapNode title="Products" description="Our Products"> <siteMapNode url="Product1.aspx" title="My Products" description="These are my products" /> <siteMapNode url="Product2.aspx" title="New Products" description="Some new products " /> </siteMapNode> <siteMapNode title="Services" description="Our Services"> <siteMapNode url="Service1.aspx" title="ASP.NET Consulting" description="Best ASP.NET Consulting" /> <siteMapNode url="Service2.aspx" title="ASP.NET Training" description="Best ASP.NET Training" /> </siteMapNode> </siteMapNode> </siteMap>
|
Now let's see how we build our menu using the .sitemap file above. All we are doing in the GetSiteMapDataSource method is getting the information from the Web.sitemap file and building the menu based on the contents of that file.
| private void CreateMenuControl()
{ Menu1.DataSource = GetSiteMapDataSource(); Menu1.DataBind(); } private SiteMapDataSource GetSiteMapDataSource() { XmlSiteMapProvider xmlSiteMap = new XmlSiteMapProvider(); System.Collections.Specialized.NameValueCollection myCollection = new System.Collections.Specialized.NameValueCollection(1); myCollection.Add("siteMapFile", "Web.sitemap"); xmlSiteMap.Initialize("provider", myCollection); xmlSiteMap.BuildSiteMap(); SiteMapDataSource siteMap = new SiteMapDataSource(); return siteMap; } |
Populating the Menu using the Database:
Suppose that you have some data in the database tables through which you want to populate the Menu. Although I prefer the .sitemap technique since that is its sole purpose but the code below shows how you can use database as a data source.
| private void PopulateMenu()
{ DataSet ds = GetDataSetForMenu(); Menu menu = new Menu(); foreach (DataRow parentItem in ds.Tables["Categories"].Rows) { MenuItem categoryItem = new MenuItem((string)parentItem["CategoryName"]); menu.Items.Add(categoryItem); foreach (DataRow childItem in parentItem.GetChildRows("Children")) { MenuItem childrenItem = new MenuItem((string)childItem["ProductName"]); categoryItem.ChildItems.Add(childrenItem); } } Panel1.Controls.Add(menu); Panel1.DataBind(); } private DataSet GetDataSetForMenu() { SqlConnection myConnection = new SqlConnection(GetConnectionString()); SqlDataAdapter adCat = new SqlDataAdapter("SELECT * FROM Categories", myConnection); SqlDataAdapter adProd = new SqlDataAdapter("SELECT * FROM Products", myConnection); DataSet ds = new DataSet(); adCat.Fill(ds, "Categories"); adProd.Fill(ds, "Products"); ds.Relations.Add("Children",ds.Tables["Categories"].Columns["CategoryID"],ds.Tables["Products"].Columns["CategoryID"]); return ds; } |
Let's first look at the GetDataSetForMenu() since its being called from PopulateMenu(). In the GetDataSetForMenu() method we make a relationship between the Categories table and the Products table.
The PopulateMenu() methods receives the DataSet from the GetDataSetForMenu() and iterates through the DataSet. For each iteration it creates a new MenuItem and adds it into the Menu items collection.
Populating the Menu Control Using XML File:
You can also populate the menu using a simple XML File. Check out the code below:
| private void CreateMenuWithXmlFile()
{ string path = @"C:\MyXmlFile.xml"; DataSet ds = new DataSet(); ds.ReadXml(path); Menu menu = new Menu(); menu.MenuItemClick += new MenuEventHandler(menu_MenuItemClick);
for (int i = 0; i < ds.Tables.Count; i++) { MenuItem parentItem = new MenuItem((string)ds.Tables[i].TableName); menu.Items.Add(parentItem);
for (int c = 0; c < ds.Tables[i].Columns.Count; c++) { MenuItem column = new MenuItem((string)ds.Tables[i].Columns[c].ColumnName); menu.Items.Add(column);
for (int r = 0; r < ds.Tables[i].Rows.Count; r++) { MenuItem row = new MenuItem((string)ds.Tables[i].Rows[r][c].ToString()); parentItem.ChildItems.Add(row); } } } Panel1.Controls.Add(menu); Panel1.DataBind(); }
|
I get the xml from the DataSet ReadXML() method. And after that its just a matter of iterating through the DataSet and making MenuItems.
I hope you liked the article. The project file is also attached please download it and run the application.