I talked a lot about the Papa GridView control now let's talk about one of its children known as DetailsView. DetailsView is also a databound control that enables you to view the records in the database individually. In this article I will show you that how you can use SQLDataSource control to insert, update and delete in the DetailsView control.
Introduction:
I talked a lot about the Papa GridView control now let's talk about one of its children known as DetailsView. DetailsView is also a databound control that enables you to view the records in the database individually. In this article I will show you that how you can use SQLDataSource control to insert, update and delete in the DetailsView control.
Creating the Database:
The database that is used is very simply and contains only one table which is called Users. Here is the schema of the Users table.
| if exists (select * from
dbo.sysobjects where id = object_id(N'[dbo].[Users]') and OBJECTPROPERTY(id,
N'IsUserTable') = 1) drop table [dbo].[Users] GO CREATE TABLE [dbo].[Users] ( [UserID] [int] IDENTITY (1, 1) NOT NULL , [FirstName] [varchar] (20) COLLATE SQL_Latin1_General_CP1_CI_AS NULL , [LastName] [varchar] (20) COLLATE SQL_Latin1_General_CP1_CI_AS NULL ) ON [PRIMARY] GO |
Creating a SQLDataSource Control:
Creating a SQLDataSource control is pretty simply, you can just drag and drop it from the toolbox right onto the form. After that it will open up the smart tag which will guide you to create the connectionstring as well as the select query to populate your controls. Here is the HTML view of the SQLDataSource control with the connectionstring property and the select query.
| <asp:SqlDataSource ID="userSqlDataSource" runat="server" ConnectionString="<%$ ConnectionStrings:ConnectionString %>"ProviderName="<%$ ConnectionStrings:ConnectionString.ProviderName %>" SelectCommand="SELECT * FROM Users"</asp:SqlDataSource> |
Setting up the DetailsView Control:
Now, its time to set up the DetailsView Control. Simply, drag and drop the DetailsView control on the form and assign its DataSourceID to the SQLDataSource control which in this case is "userSqlDataSource". In this article we will focus on the TemplateColumns instead of the BoundColumns.
We will add three TemplateColumns for the three fields in the database which are simply UserID, FirstName and LastName.
|
<asp:TemplateField
HeaderText="UserID"
InsertVisible="False"> <ItemTemplate> <asp:Label ID="lblUserID" Text='<%# Eval("UserID") %>' runat="server"></asp:Label> </ItemTemplate> </asp:TemplateField> <asp:TemplateField HeaderText="FirstName"> <ItemTemplate> <asp:Label ID="lblFirstName" Text='<%# Eval("FirstName") %>' runat="server"></asp:Label> </ItemTemplate> </asp:TemplateField> <asp:TemplateField HeaderText="LastName"> <ItemTemplate> <asp:Label ID="lblLastName" Text='<%# Eval("LastName") %>' runat="server"></asp:Label> </ItemTemplate> </asp:TemplateField> </Fields> |
As you can see in the code above I have declared three TemplateColumns inside the DetailsView control and assigned its Text property to the fields in the database. This will display the data in the DetailsView control. You can also set the following properties of the DetailsView control to true.
AutoGenerateDeleteButton: This will automatically create the delete button.
AutoGenerateEditButton: This will automatically create the edit button.
AutoGenerateInsertButton: This will automatically create the insert button.
The DetailsView control will look something like this:
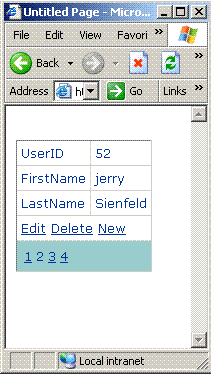
I am sure that you have noticed that I am a great fan of the comedy serial "Seinfeld".
Implementing the Insert Functionality:
Now, let's implement the insert functionality for the DetailsView control. First thing you need to do is to set up the INSERT QUERY for the SQLDataSource control.
|
<asp:SqlDataSource
ID="userSqlDataSource"
runat="server"
ConnectionString="<%$
ConnectionStrings:ConnectionString %>" InsertCommand="INSERT INTO Users(FirstName, LastName) VALUES(@FirstName, @LastName)" ProviderName="<%$ ConnectionStrings:ConnectionString.ProviderName %>" SelectCommand="SELECT * FROM Users" DeleteCommand="DELETE FROM Users WHERE UserID = @UserID " UpdateCommand="UPDATE Users SET FirstName = @FirstName, LastName = @LastName WHERE UserID = @UserID"> </asp:SqlDataSource> |
I have made the InsertCommand bold so you can see it clearly. As you can see that the insert command only takes FirstName and LastName and not the UserID. This is because UserID is an identity value in the database table "Users", which means it is automatically generated.
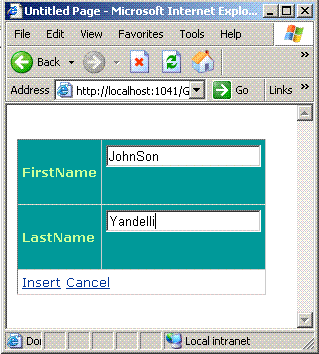
For the DetailsView control we need to create the InsertItemTemplate which will decide what to display and insert when you press on the new button link.
|
<InsertItemTemplate> <asp:TextBox ID="txtFirstName" Text='<%# Bind("FirstName") %>' runat="server"></asp:TextBox> <br /> <asp:RequiredFieldValidator ID="rfvFirstName" runat="server" ControlToValidate="txtFirstName" ErrorMessage="Invalid"></asp:RequiredFieldValidator> </InsertItemTemplate> |
In the InsertItemTemplate I am using a TextBox control with the ID "txtFirstName". This means that when you press the new link the TextBox will be shown which will allow you to insert new information (FirstName, LastName etc). The Bind("FirstName") means that this data is not only for display but it will go back to the database. It will not work if you put Eval("FirstName") since Eval only allows you to display the information and not send back to the server. I have also placed a RequiredFieldValidator control which validates the textbox.
| When you are in the insert mode you will also see UserID label. Since UserID is an identity column which is inserted automatically by the database you don't need to display it hence set its InsertVisible = false; |
Here is the screen shot:
Implementing the Delete Functionality:
The delete functionality is a bit different since it requires the UserID to be sent. Here is the delete query.
| DeleteCommand="DELETE FROM Users WHERE UserID = @UserID " |
Don't worry this is also very simple. All you need to do is to set the DetailsView DataKeyNames property to "UserID". Yup that's it this will take care of the delete functionality. You can set the DataKeyNames using the properties window of the DetailsView control.
Implementing the Edit Functionality:
Edit or the Update functionality required a query that has all the fields. A query may looks something like this:
| UpdateCommand="UPDATE Users SET FirstName = @FirstName, LastName = @LastName WHERE UserID = @UserID" |
Don't pay attention to the special characters in the query its just a simple UPDATE query. Now we need to define the EditItemTemplate for the DetailsView control.
| <Fields> <asp:TemplateField> <EditItemTemplate> <asp:TextBox ID="txtEditFirstName" runat="server" Text='<%# Bind("FirstName") %>'></asp:TextBox> </EditItemTemplate> <EditItemTemplate> <asp:TextBox ID="txtEditLastName" runat="server" Text='<%# Bind("LastName") %>'></asp:TextBox> </EditItemTemplate> </asp:TemplateField> </Fields>
|
As, you can see in the code above that the EditItemTemplate also contains the TextBox which uses Bind method. Once you click the update button the information will be updated. One interesting thing to note is that we did all the task without writing a single line of C# or VB.NET code so your code behind is literally disserted.
I have attached the source code for this project. Please feel free to download it.
I hope you liked this article, happy coding!
| If you are one of the
thousands that visit GridViewGuy for your .NET articles and resources, you
might be interested in making a donation. Extra cash helps pay for the
hosting services and speed things up
around here, and makes this website possible.
Once, again thank you very much and remember its because of you FINE people that this website is up and running. |
| Export Button is a custom control that let's you export your DataGrid or TextBox data to several different formats. The control is extremely easy to use and also exposes design time features. In this article I will discuss some of the features of the Export Button and how it benefits the developer. |