ASP.NET 2.0 came out with tons of new controls. One of the coolest control is the Wizard control which let's you input or select your content in steps. This is an idol control if you are making a registration page. In this article I will explain that how you can use the Wizard control to make a registration page.
Introduction:
ASP.NET 2.0 came out with tons of new controls. One of the coolest control is the Wizard control which let's you input or select your content in steps. This is an idol control if you are making a registration page. In this article I will explain that how you can use the Wizard control to make a registration page.
What are we going to do?
Okay we are going to make use of the Wizard control and make a multi-step registration scenario. We are going to collect FirstName, LastName, Email, UserName, Password and finally preview all user entries before giving them a confirmation message.
Using the Wizard Control:
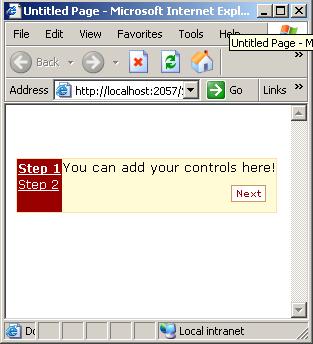
The first thing you need to do is to drag and drop a Wizard control from the toolbox on the webform. You can use the auto-format feature to make your control pretty. Take a look at the image below to get a better idea:
Adding different controls to the Wizard control:
Our next step is to add different controls to the Wizard control. Adding controls is pretty straight forward since the only thing you need to do is to drag and drop various controls into the area where I wrote "You can add your controls here" (Please see the image above).
| When adding controls in the Wizard controls it is always a good idea to add a HTML table first and then add the controls in the table. This way your controls will be aligned property and will look good. |
Take a look at the screen shot below where I have added several TextBoxes to the Wizard control.
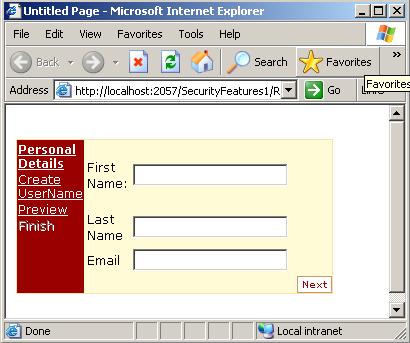
Oh! you might be wondering how does the left side bar has changed and now displaying different headings. It is pretty simple all you need to do is to use the Add/Remove Wizard Steps which is available by right clicking on the Wizard control. The display side bar also allows to jump to the steps in the wizard control. If you want to hide the side bar menu then you can make the DisplaySideBar property of the Wizard control to false.
What are the different StepTypes available in the Wizard control?
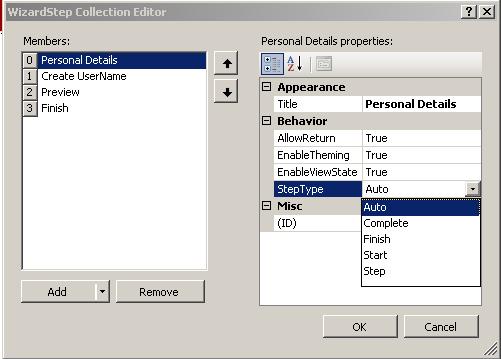
Wizard control provides you with different StepTypes which let's you configure your control in more detail. You can change the StepType of a certain step by simply using the Add/Remove Wizard Steps which is available by right clicking on the Wizard control.
StepTypes:
Auto: This StepType allows you to make a step in the Wizard control and based on its position in the Wizard control it will automatically determine what kind of the StepType it should be.
| Complete: This is a complete
step usually at the end of the Wizard. This usually displays some message
like "Thanks for registering". Finish: A little different than complete step since it displays a "Finish" button instead of only the message. Start: The first step of the Wizard control. Step: This just represents each step. |
Adding more steps to the Wizard control:
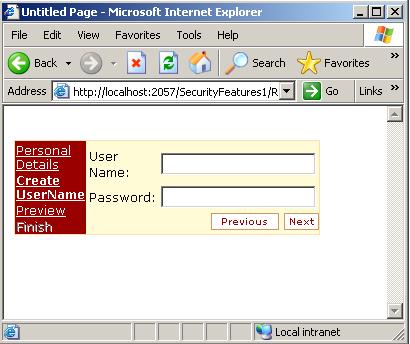
Let's add some more steps to the Wizard control. This time we are going to add the steps to add the UserName and Password and finally a preview of all the information.
And now let's see how the preview screen looks like:
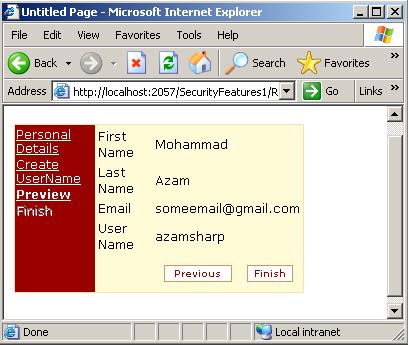
| In my opinion a preview screen should have been added by default to the Wizard control which should show all the information we entered in the input controls. Although the preview feature has not been added by default but it is pretty simply to implement. |
Adding Validation to the Wizard Control:
Adding validation is also pretty simple simply put a validation controls inside the Wizard control and set the ControlToValidate to the input control on which you want the validation to occur. In my opinion I think it's a good idea to stop the user on a certain step and ask him to fill the form instead of allowing him to go till the end and return back to the empty fields.
| Always remember to set the property ActiveStepIndex = 0 to ensure that the Wizard will start from the first step. |
Please feel free to download the the source code at the end of this article.
I hope you liked the article! happy coding.
| If you are one of the
thousands that visit GridViewGuy for your .NET articles and resources, you
might be interested in making a donation. Extra cash helps pay for the
hosting services and speed things up
around here, and makes this website possible.
Once, again thank you very much and remember its because of you FINE people that this website is up and running. |
| Export Button is a custom control that let's you export your DataGrid or TextBox data to several different formats. The control is extremely easy to use and also exposes design time features. In this article I will discuss some of the features of the Export Button and how it benefits the developer. |