In this article I will show you that how you can populate Menu control with data source based on user roles. In this article we will create two sitemaps, one will be used by Admin and other will be used by Users. The article also comes with the complete source code which can be downloaded at the end of the article.
Introduction:
In this article I will show you that how you can populate Menu control with data source based on user roles. In this article we will create two sitemaps, one will be used by Admin and other will be used by Users. The article also comes with the complete source code which can be downloaded at the end of the article.
Structure of the Application:
I am going to make this application in a structured way. Take a look at the directory structure below to get a better idea.

As, you can see in the above structure that I have arranged everything nicely. The Admin pages are in the Admin folder and the User pages are in the User folder. Now, let's get down to business and do some real stuff.
Creating the SiteMap:
SiteMaps are basically xml files with the extension .sitemap which dictates the navigation of the application. Simply, add a new sitemap file which by default will be named Web.sitemap. Please note that the Web.sitemap file must be placed in the root directory of the application as you can also see in the above screen shot. Let's look at what the Web.sitemap file contains:
| <?xml
version="1.0"
encoding="utf-8"
?> <siteMap xmlns="http://schemas.microsoft.com/AspNet/SiteMap-File-1.0" > <siteMapNode url="~/" title="root" description="Site Map Root"> <siteMapNode siteMapFile="~/Navigation/Admin.sitemap" /> <siteMapNode siteMapFile="~/Navigation/User.sitemap" /> </siteMapNode> </siteMap> |
Each sitemap file must contain a root siteMapNode element which I have made bold in the code above. Since, this article demonstrates that how you can create menus based on the role of the user that is why I have created two more sitemap files namely Admin.sitemap and User.sitemap which are placed in the Navigation folder. The main sitemap file "Web.sitemap" contains a reference to the other two files. This reference is created by using the siteMapFile attribute. I have used "~/" which means that ASP.NET will search for the Navigation folder starting from the root of the application.http://www.casa.uh.edu/ApCalculus2/Teachers/ViewStudentGrades1.aspx
Now, let's see the what does Admin.sitemap and User.sitemap contains:
| <?xml
version="1.0"
encoding="utf-8"
?> <siteMap xmlns="http://schemas.microsoft.com/AspNet/SiteMap-File-1.0" > <siteMapNode url="~/Admin/AdminHomePage.aspx" title="root" description="Admin Home Page"> <siteMapNode url="AdminPage1.aspx" title="Home" description="" /> <siteMapNode url="AdminFunctions.aspx" title="AdminFunctions"> <siteMapNode url="AddUser.aspx" title="Add User" /> <siteMapNode url="DeleteUser.aspx" title="Delete User" /> <siteMapNode url="UpdateUser.aspx" title ="Update User"/> </siteMapNode> </siteMapNode> </siteMap> |
The above Admin.sitemap file contains several nodes which makes up the navigation for the pages. The root node url must be unique in all the sitemap files. The above Admin.sitemap file will create a menu shown by the skeleton below:
| Home | Admin Functions |
| Add User | |
| Delete User | |
| Update User |
The User.sitemap is also similar to the Admin.sitemap file but creates different links with different captions.
Okay, so we have set up our Web.sitemap, Admin.sitemap and User.sitemap and now we are ready to populate a data source with the SiteMap.
Populating Sitemap Data Source:
We will populate the data source based on the role of the user. This means that if Admin logs in then Admin.sitemap file will be used to create the navigation for him. On the other hand if User logs in then User.sitemap file will be used to create the navigation for him. I have created a simple class "NavigationManager" which deals with creating the navigation for different kinds of users. NavigationManager class exposes a method "GetSiteMapDataSource" which returns the data source to the navigation control which in this case will be a Menu control. Let's see how "GetSiteMapDataSource" method is implemented:
|
public
static
SiteMapDataSource
GetSiteMapDataSource(string
role) { string url = String.Empty; if (role.Equals("Admin")) url = "~/Admin/AdminHomePage.aspx"; else if (role.Equals("User")) url = "~/User/UserHomePage.aspx"; XmlSiteMapProvider xmlSiteMap = new XmlSiteMapProvider(); System.Collections.Specialized.NameValueCollection myCollection = new System.Collections.Specialized.NameValueCollection(1); myCollection.Add("siteMapFile", "Web.sitemap"); xmlSiteMap.Initialize("provider", myCollection); xmlSiteMap.BuildSiteMap(); SiteMapDataSource siteMap = new SiteMapDataSource(); siteMap.StartingNodeUrl = url; /* This will not show the starting node and hence giving it * the horizontal cool look :) * */ siteMap.ShowStartingNode = false; return siteMap; }
|
The GetSiteMapDataSource method takes "role" as an argument. If the role is "Admin" then we assign it a certain url. The assigned url is the same as we have put for the root node in the Admin.sitemap. If the role is "User" then we assign it a url which is the root node url in the User.sitemap file.
Another important point to note in the above code is that I have assigned the url to the siteMap.StartingNodeUrl property. This means that it will start building the navigation from the url which is gets based on the role of the user. Also the siteMap.ShowStartingNode is set to false. This is because we don't want to show the root node to the user. If you show the root node then you will not be able to set the Menu control to display horizontally properly.
Making a Login Page:
The login page simply authenticates the user through his user name which is hard coded into the page code. Here is what the login page looks like:
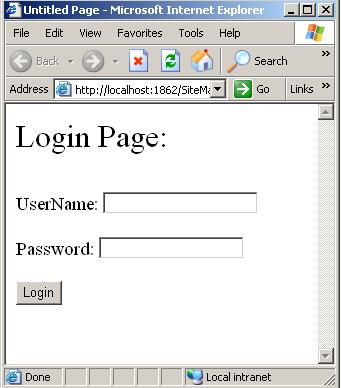
And here is the code that authenticates the user.
|
protected
void Page_Load(object
sender, EventArgs
e) { string userName = txtUserName.Text; string password = txtPassword.Text; // Make your own login and authentication if (userName.Equals("azamsharp")) Response.Redirect("~/Admin/AdminHomePage.aspx"); else if(userName.Equals("someuser")) Response.Redirect("~/User/UserHomePage.aspx"); } |
As, you can see in the above code that if the user is "azamsharp" then he is redirected to the "~/Admin/AdminHomePage.aspx" and if he is "someuser" then he is redirected to "~/User/UserHomePage.aspx" page.
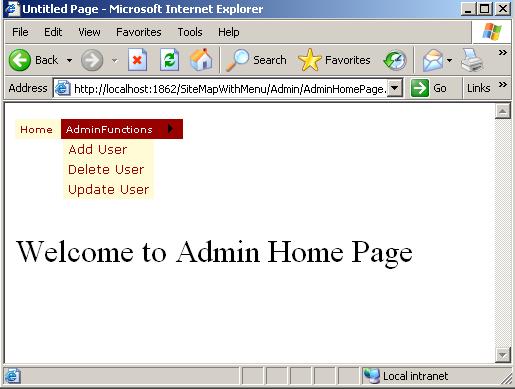
AdminHomePage.aspx:
Since, I am coming to the Admin page I need an Admin menu that is why in the code below I am sending "Admin" as an argument to the GetSiteMapDataSource method.
|
public
partial
class
Admin_AdminHomePage :
System.Web.UI.Page { protected void Page_Load(object sender, EventArgs e) { if (!Page.IsPostBack) { Menu1.DataSource = NavigationManager.GetSiteMapDataSource("Admin"); Menu1.DataBind(); } } } |
And here is what the AdminHomePage.aspx looks like:
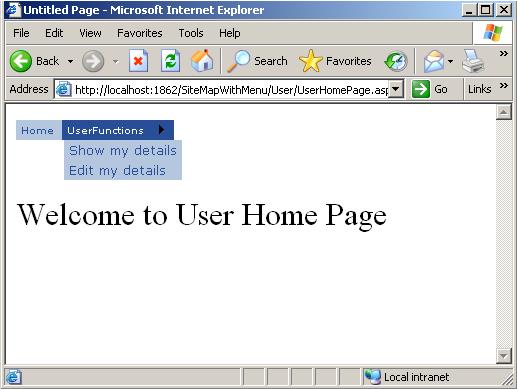
If you log in as User then you will see the following page:
Conclusion:
As, you saw in the article that ASP.NET 2.0 menu control and sitemap data source has ease the development of implementing navigation scenarios. If you want to use a different data source for the menu control then be sure to check out my article "Populating Menu Control With Different Sources".
Please feel free to download the the source code at the end of this article.
I hope you liked the article! happy coding.