Our life is filled with events, lots of events. To accomplish most if not all we must schedule them on certain dates. This task is accomplished by marking the important dates on the calendar. In this article I will demonstrate how to create a very simple Event Calendar using ASP.NET.
Introduction:
Our life is filled with events, lots of events. To accomplish most if not all we must schedule them on certain dates. This task is accomplished by marking the important dates on the calendar. In this article I will demonstrate how to create a very simple Event Calendar using ASP.NET.
Database Design:
The database consists of a single table called “Schedules”. The schedules table contains the following fields:
ScheduleID: This is the primary key of the table.
Title: This holds the title of the task.
ScheduleDate: The scheduled date of the task.
The purpose of the table is to hold the events scheduled for the particular day.
Retrieving Data from the Database:
The next step is to retrieve the data from the database. For this I have created a small method called GetDate() which returns the DataSet.
private DataSet GetData()
{
string connectionString = "Server=localhost;Database=School;Trusted_Connection=true";
SqlConnection myConnection = new SqlConnection(connectionString);
SqlDataAdapter ad = new SqlDataAdapter("SELECT * FROM Schedules", myConnection);
DataSet ds = new DataSet();
ad.Fill(ds);
return ds;
}
The next step is to populate the Calendar with the data from the database.
Using the DayRender Event to Populate Calendar:
The DayRender event of the Calendar control is fired each time the day is rendered. This is the perfect place to fill the calendar day box with the custom data.
protected void Calendar1_DayRender(object sender, DayRenderEventArgs e)
{
DataSet ds = GetData();
string link = "<a href='ScheduleDetails.aspx?scheduleID=";
string s = e.Day.Date.ToShortDateString();
e.Cell.Text = e.Day.Date.Day.ToString() + "<BR>";
LiteralControl l = new LiteralControl();
l.Text = e.Day.Date.Day.ToString() + "<BR>";
e.Cell.Controls.Add(l);
foreach (DataRow row in ds.Tables[0].Rows)
{
string scheduledDate = Convert.ToDateTime(row["ScheduleDate"]).ToShortDateString();
if (scheduledDate.Equals(s))
{
LinkButton lb = new LinkButton();
lb.Text = link + (int)row["ScheduleID"] + "'>" + row["Title"] as String + "</a>" + "<BR>";
e.Cell.Controls.Add(lb);
}
}
HtmlAnchor anchor = new HtmlAnchor();
anchor.InnerHtml = "Add";
string method = "ShowAddTaskPane(event,'" + e.Day.Date.ToShortDateString() + "')";
anchor.href="#";
anchor.Attributes.Add("onclick", method);
e.Cell.Controls.Add(anchor);
}
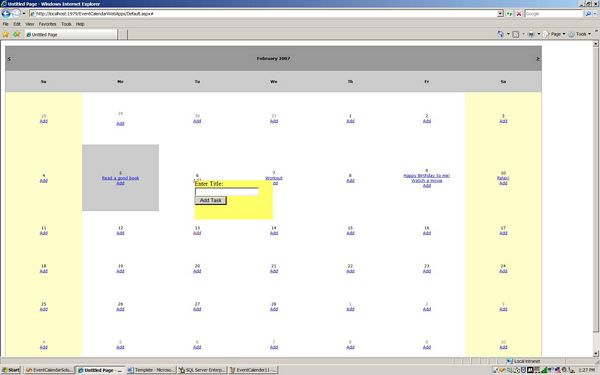
I know you must be wondering that why the DayRender contains all that code. Well, aside from populating the Calendar day box with the title of the event we are also making them hyperlinks so the user can view the details of that event. Also, we are adding an “Add” button which allows to quickly adding new events. Now, if you run the page you will see the Calendar filled with the events.

The above image shows what the calendar will look like when it is rendered on the page. If you hover over the event then you will notice that it is pointing to the “ScheduleDetails.aspx” page. You can easily create “ScheduleDetails.aspx” page which, simply shows the details about the event.
Adding a New Event:
Adding a new event can be accomplished in number of ways which includes sending the user to a new page which shows the fields associated with adding an event. In my opinion user should not be send to a different page and the “Add Event” feature should be available on the same page where the calendar is displayed. So, let’s see how we can allow the user to add the event(s) without leaving the calendar page.
The first task is to create a <DIV> element which contains a TextBox and a Button control to add a new event.
<div id="AddTaskPane" onblur="this.style.visibility='hidden'" style="position:absolute; visibility:hidden; width:200px; height:100px; background-color:#FFFF66">
Enter Title: <asp:TextBox ID="txtTitle" runat="server" />
<asp:Button ID="Btn_AddTask" runat="server" Text="Add Task" OnCommand="Btn_AddTask_Command" />
</div>
The <DIV> is made invisible and will only appear when the “Add” link is clicked. The code to create the “Add” link is inside the DayRender event but I am re-pasting it so that you will have a better idea.
HtmlAnchor anchor = new HtmlAnchor();
anchor.InnerHtml = "Add";
string method = "ShowAddTaskPane(event,'" + e.Day.Date.ToShortDateString() + "')";
anchor.href="#";
anchor.Attributes.Add("onclick", method);
e.Cell.Controls.Add(anchor);
The ShowAddTaskPane is fired when the user clicks on the “Add” link. Let’s take a look at the ShowAddTaskPane method.
function ShowAddTaskPane(e,selectedDate)
{
var ev = e || window.event;
document.getElementById("AddTaskPane").style.visibility = 'visible';
document.getElementById("AddTaskPane").style.top = ev.clientY;
document.getElementById("AddTaskPane").style.left = ev.clientX;
CallServer(selectedDate,'');
}
The ShowAddTaskPane method takes two arguments which are event e and the selectedDate. The event e is used to display the <DIV> in the current mouse clicked position. The CallServer method calls the server side method using ASP.NET 2.0 Client Callbacks. I will talk about it later in this article.
The effect is shown in the image below. The <DIV> will appear on the same position the mouse is clicked.
How to Find the Selected Date:
Now, I will answer the question that why the ShowAddTaskPane contains the parameter selectedDate and what is the purpose of the CallServer method. The selectedDate is passed so, that we will know which “Add” link is clicked inside the Calendar. The CallServer method sends the selectedDate to the code behind and stores it in the Session variable. This way the selected date is maintained. You might be wondering that the ViewState should have been a better choice of storing the selected date unfortunately, the ViewState will not work and will be null every time.
The code to initialize the client callbacks and inserting the new event in the database is available in the download.
Conclusion:
In this article we learned how to create a simple event calendar. The calendar can be extended to include deleting and editing an event. I leave this exercise for the reader.
I hope you liked this article, happy coding!
UPDATE(02/06/2007): The download sample has been updated. The code now works with IE and FireFox.