In-Place editing was introduced in ASP.NET 1.X with the inclusion of the Datagrid control. The feature allows the user to edit the row without having to leave the page. In this age of AJAX we need to edit the individual rows without having to trigger a server side postback. In this article I will demonstrate how to build the in-place editing feature using ASP.NET 2.0 callbacks.
Introduction:
In-Place editing was introduced in ASP.NET 1.X with the inclusion of the Datagrid control. The feature allows the user to edit the row without having to leave the page. In this age of
Database Design:
The database design is very simple and consists of only two tables. The first table is “Categories” and the second table is “Articles”. The relationship between the two tables is one to many as a single category can contain many articles and many articles can belong to a single category.
Registering Client Callbacks:
The first thing that you need to do is to register the client callbacks. Let’s check out the code below which is used to register the client callbacks.
protected void Page_Load(object sender, EventArgs e)
{
if (!Page.IsPostBack)
{
PopulateCategories();
}
// register the client callbacks scripts
string cbReference = ClientScript.GetCallbackEventReference(this, "arg", "RecieveServerData", "context");
string script = String.Empty;
if (!ClientScript.IsClientScriptBlockRegistered("CallServer"))
{
script = "function CallServer(arg,context) { " + cbReference + "}";
ClientScript.RegisterClientScriptBlock(this.GetType(), "CallServer", script, true);
}
}
I will not go into detail on how the client callbacks are registered. If you are interested you can read the following articles.
Client Callbacks in ASP.NET 2.0
DropDownList Dependency Using Client Callbacks
Populating DropDownList:
The next task is to populate the DropDownList with the categories. This is a simple task and can be performed easily using the server side code.
private void PopulateCategories()
{
string connectionString = ConfigurationManager.ConnectionStrings["ConnectionString"].ConnectionString;
SqlConnection myConnection = new SqlConnection(connectionString);
SqlDataAdapter ad = new SqlDataAdapter("SELECT * FROM Categories",myConnection);
DataSet ds = new DataSet();
ad.Fill(ds);
ddlCategories.DataSource = ds;
ddlCategories.DataTextField = "Title";
ddlCategories.DataValueField = "CategoryID";
ddlCategories.DataBind();
}
And here is the HTML code for the DropDownList.
Select a category: <asp:DropDownList ID="ddlCategories" onchange="GetArticles()" runat="server" />
The DropDownlist onchange method is fired whenever you change the selection from a DropDownList. The GetArticles method is responsible for retrieving all the articles related to the selected category.
The GetArticles() Method:
Let’s check out the implementation of the GetArticles method.
var GET_ARTICLES = "GET_ARTICLES:";
// get the articles
function GetArticles()
{
var selectedValue = document.getElementById("ddlCategories").value;
CallServer(GET_ARTICLES+selectedValue,'');
}
First, I retrieve the selected value from the DropDownList and then I call the CallServer method.
ASP.NET 2.0 Client Callbacks does not differ between different callbacks originating from different controls. For this reason I pass the values to the server method using the keyword:data approach. In the above implementation the “GET_ARTICLES” is the keyword and the selected categoryID is the data.
The CallServer method will call the RaiseCallbackEvent method on the server side. Inside the RaiseCallbackEvent method we distinguish the type of request using the keyword.
public void RaiseCallbackEvent(string eventArgument)
{
string[] req = SplitCallback(eventArgument);
if (req[0].Equals("GET_ARTICLES"))
{
returnValue = TableManager.ConvertDataToHTMLTable(DataManager.GetArticles(Int32.Parse(req[1])));
}
else if (req[0].Equals("DELETE_ARTICLE"))
{
DataManager.DeleteArticle(Int32.Parse(req[1]));
}
else if (req[0].Equals("UPDATE_ARTICLE"))
{
DataManager.UpdateArticle(req[1]);
}
}
Since, the eventArgument contains the keyword as well as the data we will need to separate them using the split method. The SplitCallback method is used to split the keyword from the data. Once, the eventArgument is split we can call the appropriate method. The DataManager class is responsible for returning the articles in the form of the DataSet.
public static DataSet GetArticles(int categoryID)
{
string connectionString = ConfigurationManager.ConnectionStrings["ConnectionString"].ConnectionString;
SqlConnection myConnection = new SqlConnection(connectionString);
SqlCommand myCommand = new SqlCommand("SELECT ArticleID, Title FROM Articles WHERE CategoryID = @CategoryID", myConnection);
myCommand.Parameters.AddWithValue("@CategoryID", categoryID);
SqlDataAdapter ad = new SqlDataAdapter(myCommand);
DataSet ds = new DataSet();
ad.Fill(ds);
return ds;
}
The returned DataSet is fed to the ConvertDataToHTMLTable method of the TableManager class. The ConvertDataToHTMLTable method is responsible for converting the DataSet to the HTML table.
public static string ConvertDataToHTMLTable(DataSet data)
{
// get the table
Table table = GetTable(data);
StringWriter sw = new StringWriter();
HtmlTextWriter htw = new HtmlTextWriter(sw);
table.RenderControl(htw);
return sw.ToString();
}
The GetTable method is responsible for creating the HTML table and appending the link buttons to the rows. The GetTable method is given below:
private static Table GetTable(DataSet data)
{
int rowIndex = 0;
Table table = new Table();
table.CssClass = "TableStyle";
TableHeaderRow headerRow = new TableHeaderRow();
for (int columnIndex = 1; columnIndex < data.Tables[0].Columns.Count; columnIndex++)
{
TableCell tableCell = new TableCell();
tableCell.Text = data.Tables[0].Columns[columnIndex].ColumnName;
headerRow.Cells.Add(tableCell);
}
foreach (DataRow row in data.Tables[0].Rows)
{
TableRow tableRow = new TableRow();
tableRow.ID = "TableRow" + rowIndex;
object[] items = row.ItemArray;
for (int i = 1; i < items.Length; i++)
{
TableCell cell = new TableCell();
cell.Text = items[i].ToString();
tableRow.Cells.Add(cell);
}
TableCell deleteButtonCell = new TableCell();
HtmlAnchor anchorDelete = new HtmlAnchor();
anchorDelete.href="#";
anchorDelete.InnerHtml = "Delete";
deleteButtonCell.Controls.Add(anchorDelete);
anchorDelete.Attributes.Add("onclick", "DeleteArticle("+items[0].ToString()+")");
TableCell editButtonCell = new TableCell();
editButtonCell.ID = "EditCell" + rowIndex;
HtmlAnchor editButton = new HtmlAnchor();
editButton.href="#";
editButton.InnerHtml = "Edit";
editButton.Attributes.Add("onclick", "EditArticle('" + tableRow.ID + "',"+items[0].ToString()+")");
editButtonCell.Controls.Add(editButton);
tableRow.Cells.Add(deleteButtonCell);
tableRow.Cells.Add(editButtonCell);
table.Rows.Add(tableRow);
// increment the index
rowIndex++;
}
table.Rows.AddAt(0, headerRow);
return table;
}
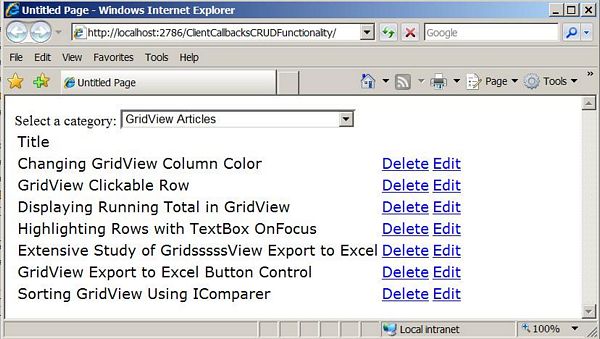
Here is the screen shot showing the articles returned when the category is selected.
Implementing the Edit Functionality:
When the edit button is clicked it fires the EditArticle JavaScript function. The EditArticle function takes two arguments. One is the ID of the row and the other is the primary key of the selected article. The following line is taken from the GetTable method.
editButton.Attributes.Add("onclick", "EditArticle('" + tableRow.ID + "',"+items[0].ToString()+")");
The EditArticle functions perform various tasks.
a) Hide the edit link
b) Show the update and cancel links.
c) Convert the Literal into TextBox control and displays the data in the TextBox.
Now, let’s see how the EditArticle function is implemented.
function EditArticle(rowID, id)
{
articleID = id;
selectedRow = document.getElementById(rowID);
// Highlight the selected row
HighlightRow();
var cells = selectedRow.getElementsByTagName("TD");
// hide the edit button
HideEditButton();
var textBox = null;
for(i=0;i<cells.length;i++)
{
textBox = document.createElement("INPUT");
textBox.ID = "textbox"+i;
textBox.value = cells[i].innerHTML;
var child = cells[i].childNodes[0];
if(child.nodeValue != null)
{
child.nodeValue = '';
// append the textbox
cells[i].appendChild(textBox);
}
}
// create the update link
var tdUpdate = document.createElement("TD");
var linkUpdate = document.createElement("<A>");
linkUpdate.innerHTML = "Update";
linkUpdate.href="#";
linkUpdate.onclick = UpdateArticle;
tdUpdate.appendChild(linkUpdate);
selectedRow.appendChild(tdUpdate);
// create the cancel link
var tdCancel = document.createElement("TD");
var linkCancel = document.createElement("<A>");
linkCancel.innerHTML = "Cancel";
linkCancel.href="#";
linkCancel.onclick = function() { GetArticles(); }
tdCancel.appendChild(linkCancel);
selectedRow.appendChild(tdCancel);
}
The EditArticle function accepts the rowID and the articleID. The rowID is used to fetch the selected row. Next all the cells contained inside the row are retrieved.
I iterate through the cells and create the TextBox control using the document.CreateElement function. Once, the TextBox is created I assign the text from the cell to the Text property of the TextBox control.
At the end the update and the cancel links are created and appended to the selected row. The function HideEditButton is used to hide the edit button when the Table is in edit mode.
var editCellPattern = '^EditCell';
// hide the edit button
function HideEditButton()
{
var id = '';
for(i=0; i<selectedRow.childNodes.length;i++)
{
id = selectedRow.childNodes[i].id;
if(id != null && id != '')
{
if(IsMatch(id))
{
// removes the child
selectedRow.removeChild(selectedRow.childNodes[i]);
}
}
}
}
The HideEditButton functions works by finding all the cells inside the selected row which matches the pattern “EditCell”. If you look at the GetTable method then you will find out that each edit cell is created with the same prefix “EditCell”.
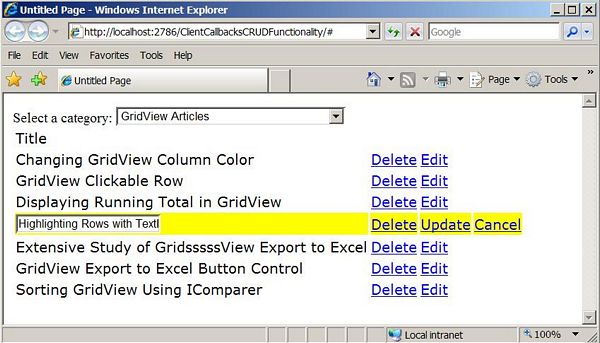
Check out the screenshot below:
Implementing the UpdateArticle Function:
At this point our Table is in edit mode and we can change the text in the TextBox. Now, let’s see how the UpdateArticle function is implemented.
// update the article
function UpdateArticle()
{
var elements = selectedRow.getElementsByTagName("INPUT");
var updateItems = '';
for(i=0;i<elements.length;i++)
{
if(IsTextBox(elements[i]))
{
updateItems += articleID + ',' + elements[i].value + ',';
}
}
CallServer(UPDATE_ARTICLE+Trim(updateItems),'');
// refresh the grid to view the updated results.
GetArticles();
}
First, I retrieve all the INPUT controls from the selectedRow. Then I iterate through all the INPUT controls and find out if the control is of type TextBox. This is performed by using the IsTextBox function which checks the type of the element. The articleID is a global variable which was assigned in the EditArticle function. A string is created which contains the articleID and the edited data. Finally the list is send to the server side method with the keyword “UPDATE_ARTICLE” for processing.
The DataManager.UpdateArticle method will finally update the article in the database.
public static void UpdateArticle(string items)
{
string[] itemArray = items.Split(',');
string connectionString = ConfigurationManager.ConnectionStrings["ConnectionString"].ConnectionString;
SqlConnection myConnection = new SqlConnection(connectionString);
SqlCommand myCommand = new SqlCommand("UPDATE Articles SET Title=@Title WHERE ArticleID = @ArticleID", myConnection);
myCommand.Parameters.AddWithValue("@ArticleID", Int32.Parse(itemArray[0]));
myCommand.Parameters.AddWithValue("@Title", itemArray[1]);
try
{
myConnection.Open();
myCommand.ExecuteNonQuery();
}
finally
{
myConnection.Close();
myCommand.Dispose();
}
}
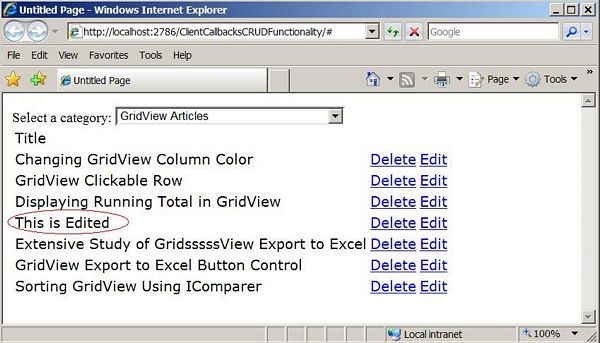
Take a look at the screenshot below which displays the table after being updated.
The cancel and delete functionalities are very similar and are discussed in the sample download.
Known Issues:
Currently, the example does not work with the FireFox browser. I will post the update when the solution is available.
Conclusion:
In this article we learned how to perform in-place editing using ASP.NET 2.0 Client Callbacks. The use of Client Callbacks eliminated the server side postbacks which resulted in smoother user experience.