Most of the shopping websites enable the user to drag and drop their product in their shopping basket. This creates an attractive and interactive user experience. In this article we are going to create a shopping cart by using the jQuery library to perform Drag and Drop operations.
Recommended Reading:

There are quite a number of articles on HighOnCoding which explains how to create Drag and Drop operations using client side code. If you are interested here is the complete list of articles and videos:

1) jQuery Shopping Cart with Images and Quantity Management
2) Browser Compatible Drag and Drop Shopping Cart
3) Drag and Drop with Persistence Using jQuery
4) Drag and Drop Using JavaScript

Downloading jQuery and jQuery.UI Library:

The first thing you would want to do is to download the jQuery and jQuery UI library. You can download the libraries using the following URL:

jQuery
jQuery.UI

Database Design:

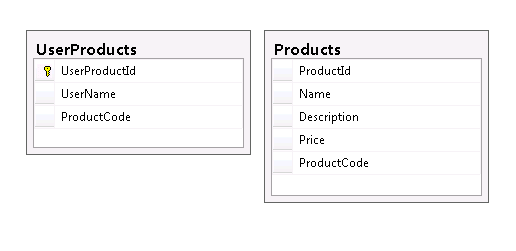
Our demo consists of a very simple database. It consists of two tables Products and UserProducts. Products table holds all the products information which is used to display the products on the screen. The UserProducts will be explained in the next article. The database schema is shown below:


In the next section we will demonstrate how to display products on the page.

Displaying Products on the Page:

There are several different ways of displaying products on the page but since this is a WebForms application we are going to use the DataList control. To keep things simple we have used the LINQ to SQL as a data access layer. The implementation below is used to get the products out of the database.


The next step is to display the products on the page. The ASPX code for the DataList control is shown below:


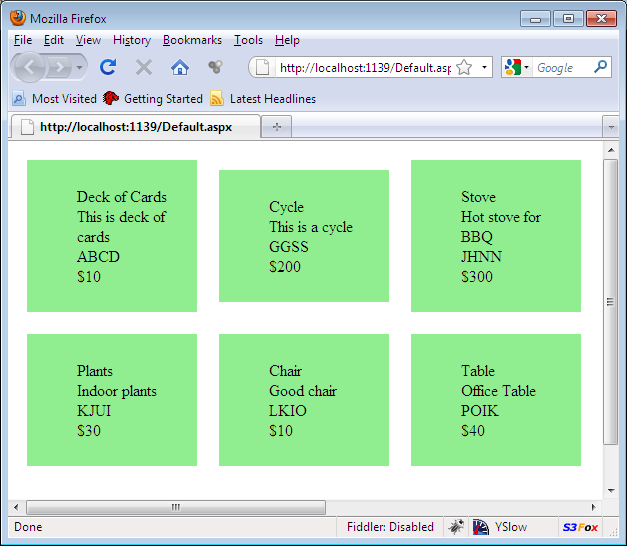
The result is shown in the screenshot below:


Let's analyze the above code. The ItemTemplate of the DataList control consists of a <div> element which has the class "block". The block class is used to represent the item as a draggable item. Each product is identified uniquely by a product code. The list item for the product code is decorated by a "productCode" class.

In the next section we will make the DIV elements with the "block" class draggable items.

Making Draggable Items:

When using plain vanilla JavaScript you need to handle all the drag and drop events and also their coordinates which represents whether the draggable item is within the drop zone or not. This becomes complicated really fast. jQuery hides all the complexity and makes it very simple to make the item draggable. The following code is used to make all the HTML elements with the class "block" a draggable element.


The helper option for the draggable function allows the user to create a clone of the element and not move the actual element on the web page.

Creating a Drop Zone:

The drop zone acts as a area where the draggable items can be dropped. You can consider it as a shopping basket where the products can be added. jQuery makes it easy to create drop zones. Althought multiple drop zones can easily be created but we will be using a single drop zone in this article. The implementation below is used to create a drop zone.


The drop zone is a simple DIV element with the ID "shoppingCart". The DIV is marked as a drop zone with the use of the droppable function. The droppable function takes multiple parameters. In this article we are using the accept and the drop functions. The accept option indicates what type of draggable elements are accepted by the drop zone. In the code above we have specified that the drop zone can accept elements which has the class "block". If you remember correctly all the draggable elements we created previously were assigned the class "block". The drop function is triggered whenever a draggable element is released inside the drop zone.  In the next section we are going to add the dropped element to our drop zone. 

Adding Draggable Element to the Drop Zone:

In the previous sections we learned how to create a draggable elements as well as drop zones. In this section we are going to add the draggable items to the shopping cart. The droppable function has a drop option which invokes a function whenever an item is dropped inside the drop zone. We must utilize the drop function to add the dropped item into our drop zone.


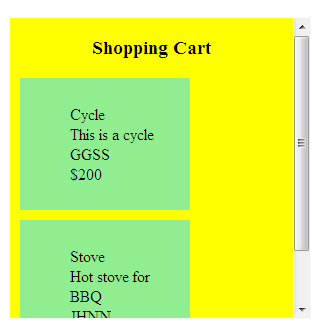
The ui.draggable represents the item being dragged. We create a clone of the item and then add it to the drop zone by using the append function. Creating a clone is necessary to make it effective or else the actual product is removed from the listing and added to the drop zone. The screenshot below shows the product added to the shopping cart.


Conclusion:

In this article we learned the basics of using the drag and drop API provided by the jQuery and jQuery.UI libraries. In the future article we will demonstrate how to perform Ajax actions and persist the elements in the database. 

[Download Sample]