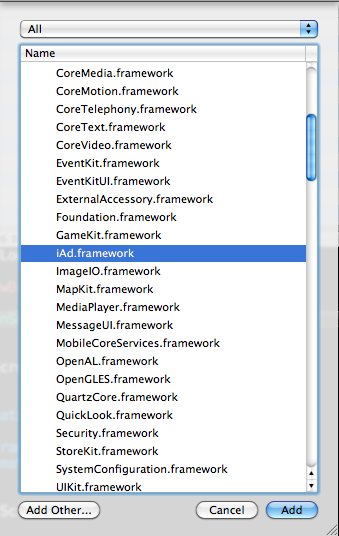
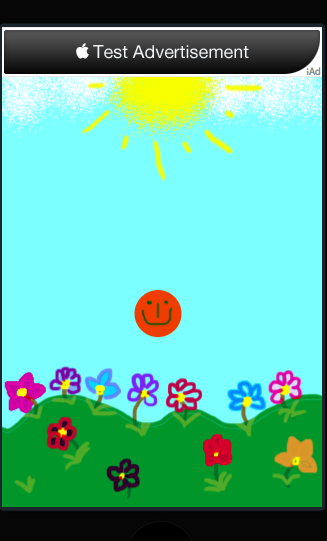
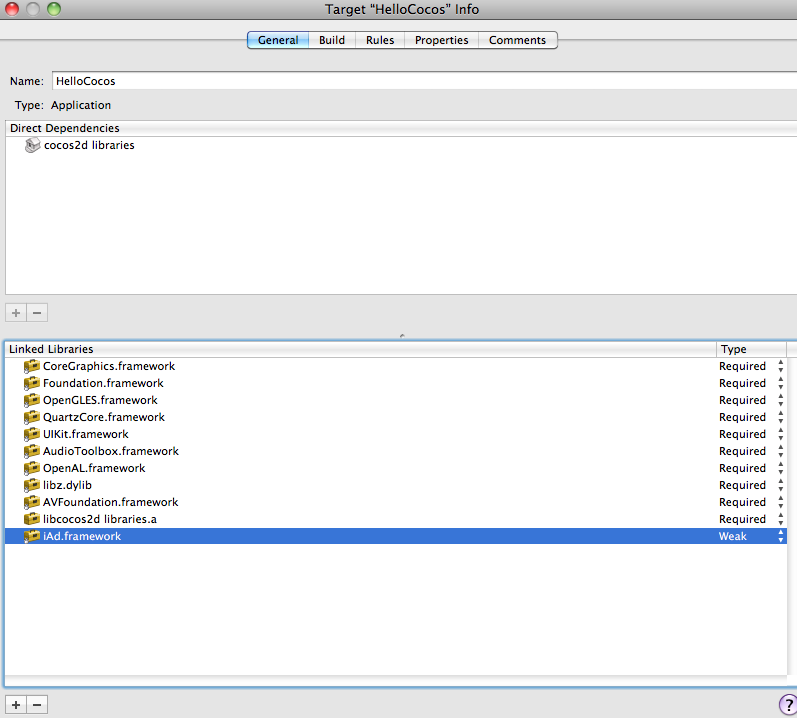
Apple app store allows the developers to be compensated for their apps in multiple ways. The most common method is to put a price tag on your app. The other method which is introduced recently is through displaying advertisements in the app. In this article we will demonstrate how to display ads in a Cocos2d application.

Getting Started:

The first step in getting started with iAds is to reference the iAds framework. Right click on the Frameworks folder and select "Add Existing Frameworks". Then select iAd.Framework and add it to the application. Take a look at the screenshot below to get a clear picture:


Congratulations you have linked to the iAd framework in your application. In the next section we will demonstrate how to implement iAd in the application.

Implementing iAd in Cocos2d Application:

Cocos2d application is different from a regular application since it not necessarily follow the typical MVC structure. In order to integrate iAd in a Cocos2d application we need to structure our Cocos2d application in MVC form. Add a new file to the project and name it "RootViewController". Make sure that the RootViewController inherits from UIViewController as shown in the implementation below:


The RootViewController also implements the ADBannerViewDelegate interface. The ADBannerViewDelegate is used to receive events from the iAd and it is necessary for iAds to work properly. Open your Cocos2d delegate file which in this case is named "HelloCocosAppDelegate.m" and implement the following code inside the "applicationDidFinishLaunching" method.


The above code will initialize the RootViewController and add the view of the controller as a subview to the window. In the next section we are going to take a look at the RootViewController where the actual magic takes place.

Implementing RootViewController:

The RootViewController is responsible for displaying the game view as well as the iAd view. The idea is to dynamically add the ADBannerView to the main view along with the Game view. The ADBannerView is added to the RootViewController as a public property as shown in the following code:


The viewDidLoad event is triggered as soon as the view is loaded. Our main code will be inside the viewDidLoad event as shown in the implementation below:


Let's analysize the above code step by step. First the [super viewDidLoad] is fired which makes sure that everything is initialized properly. Then a shared director is created which is responsible for putting the scene on the view. We set the device orientation and turn off the frame rate display. The EAGLView is fetched using the director. EAGLView is the view where the game takes place. A conditional check is used to make sure that the device and the iOS version supports the iAd Framework. If the iAd framework is supported then the bannerView is added to the subview. The ADBanner supports multiple sizes and you should use the banner size appropriate for your app. Since, our application only works in portrait mode we choose 320X50 banner size. The moveBannerOffScreen is used to move the banner out of the view. The reason we initially move the banner out of the screen is that we want to make sure that we have ads to display. If we do not move the banner off the screen and there are no ads to display then it will simply display an ugly white area.

NOTE:
Apps that do not hide the banner view when the banner is not visible are *rejected* by Apple.

The moveBannerOffScreen is implemented below:


As, shown in the above code the banner view is moved off the screen by giving it coordinates above the view. The bannerViewDidLoadAd is fired when the banner is loaded successfully. This is where you move the ads on the view. The bannerViewDidLoadAd is implemented below:


moveBannerOnScreen simply moves the banner on the view. The screenshot below shows the Ad in action:


The ad is displayed on the top part of the view. You can place ad anywhere but Apple recommends to choose either the top part of the view or the bottom part of the view. This placement will make sure that the ads are not interfering with the actual application. Also, note that these are just test ads which makes sure that the ads are running smoothly in your application. When the application is live in the app store then Apple will send relevant ads to your app.

The iAd network must be activated before submitted the app for approval. If the iAd network is not activated then ads will not be displayed. You can activate the iAd network for your particular app by logging into iTunes connect and managing the desired application. You do not need to activate the iAds network when only running test ads.

Another point to note is that sometimes you will see the following error:


Do not worry to much about this error since this simply means that your application is having trouble communicating with the Apple iAd server. Most of the time the problem is on Apple's end and the only thing you can do is wait and try again at later time.

Oh Wait You Forgot to Weak Link:

You saw your ads running on the iPhone with the latest iOS version and you were very excited that you instantly submitted your app to the app store. Big mistake! The reason is that your app will crash on the devices on which iAd is not supported. You can try this out by changing the simulator to iPad Simulator 3.2 and running your app. It will crash with the error message that "iAd framework was not found". In order to avoid the crash we need to weak link the iAd framework. Take a look at the screenshot below which shows how to weak reference a framework.        


After performing the weak reference make sure to run the app on the simulator and the iPad device (if you have one) to make sure that the app is not crashing due to missing framework.
 
Conclusion:

In this article we learned how to add iAd to a Cocos2d application. The article also discusses how to structure the Cocos2d project in the form of MVC application.