In this article we are going to begin our quest to implement Route Tracker application. The route tracker application will track the route traveled by the user. This article will focus on creating a start up view which will display weather information to the user. The next article will dive deeper into plotting user location on the map.
Why Route Tracker?
The main purpose of this application is to plot the route traveled by the user on foot. This app can mainly be used when the user is jogging and provides route related information to the user.
Creating the Weather View:
Before a user goes out to jog the most important thing is to know about the current weather conditions. Bad weather can postpone the jogging session while good weather can extend the session. There are several different sources which can be used to fetch the weather information. The link below shows number of excellent sources:
http://blog.programmableweb.com/2009/04/15/5-weather-apis-from-weatherbug-to-weather-channel/
In this article we are going to utilize the Google Weather API which can easily be used to get weather information. You can get more information regarding the Google Secret Weather API using the link below:
http://blog.programmableweb.com/2010/02/08/googles-secret-weather-api/
For starting out we are going to use a static URL which will point to Houston, TX. Here is the URL:
http://www.google.com/ig/api?weather=Houston,TX
The above URL will return XML data related to the current and future weather conditions for Houston, TX. We are mainly interested in the current_conditions tag which is shown below:
Finally, it is raining in Houston! :)
Consuming Weather Information:
Our next task is to consume the weather information and display it on the view. For that purpose we have created a WeatherService class which will parse through the XML feed and populate the WeatherInfo object.
The implementing of the getWeatherInfo is shown below:
In the above code we have used the NSXMLParser class to parse through the XML feed. The didStartElement delegate method is responsible for parsing through the feed. The implementation is shown below:
Since, we are only interested in the current_condition we only create a single WeatherInfo object. Finally, depending on the weather conditions we assign an image to the weatherConditionImage property of the WeatherInfo class.
NOTE: Special thanks to Rhonda Tipton for these images. You can follow Rhonda on twitter at @RhondaTipton and check out her awesome photography at http://www.flickr.com/photos/rhonda-tipton/
Displaying Information on the View:
In this section we are going to display all the information we collected in the previous section on the view. The view is divided into two parts. The upper part is used for the toolbar and the lower part is used to display the weather information. The screenshot is shown below:
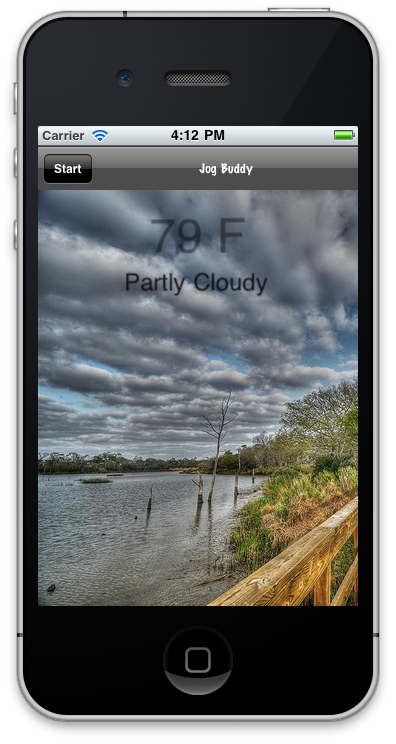
Both the labels are placed on top of the view called "weatherInfoView". We used UIView instead of UIImageView since UIImageView does not have the capability to place objects on top of it. Inside the viewDidLoad method of the HomeViewController we invoke the getWeatherInfo method which returns the WeatherInfo object.
If you decided to display the weather condition images based on the URL then you can use the UIImage imageWithData method as shown in the code below:
The result is shown in the following screenshot:
Conclusion:
In this article we demonstrated how to consume XML weather feed and display it on our view. In the future article we will dive into the details and learn how to track the user location and plot it on the screen.