In the last article we discussed how to take pictures using on your iOS device with the help of the UIImagePickerController. In this article we are going to use the new iOS 5 framework called “Core Image” to create and apply effects to the images.
Core Image:
Core Image was introduced in iOS 5 framework. Core Image allows to create special effects for the images. Core Image also has the capability of face detection which will be covered in a separate article. You can read more about Core Image at the Apple Developer’s website using the link below:
Core Image
Creating Filters:
Core Image comes with many different built in filters that are ready for use. You can get a complete list of filters using the link below:
Core Image Filters
We will be working with three different classes during our adventures with the Core Image framework. These classes are listed below:
CIContext: The CIContext is the most important class in the Core Image framework. CIContext class is responsible for creating a new image based on the applied filters.
CIFilter: The CIFilter class represents a filter. As mentioned above there are several different filters already part of the Core Image framework. You can also make a custom filter which we will learn in future article.
CIImage: The image generated from the CIContext is known as core image represented by CIImage class. The UIImage provide methods to easily convert from and to CIImage object.
The ViewController header file has been modified to make use of the CIContext, CIFilter and CIImage classes as shown in the implementation below:
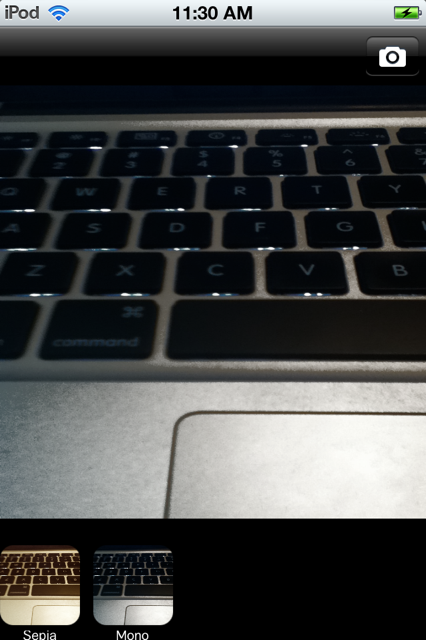
Just like Instagram we will use the UIScrollView control to display the available filters but instead of displaying a static image as a preview for the filter we will use the latest image taken by the camera as our preview image. In the last article we implemented the didFinishPickingMediaWithInfo method. We have added a call to our custom method loadFiltersForImage which will create and display the filters inside the UIScrollView.
The loadFiltersForImage method is implemented below:
The method loadFiltersForImage takes in a new fresh image as an argument and create two filters. The CIFilter is the actual class responsible for making a filter. The Filter class is simply a wrapper to include the filter name with the CIFilter object. The Filter class is implemented below:
The createPreviewViewsForFilters method is responsible for creating the preview UIImageViews which will represent each of the filter.
There is a lot going on inside the createPreviewViewsForFilters method. Each preview filter image is represented by UIImageView which is inside UIView. UIView also contains a UILabel which displays the name of the filter. The CIContext instance named context is used to create a new CIImage which is later converted to UIImage and fed to the UIImageView.
When the filter preview images are loaded you will notice that they are not displayed correctly. They are rotated -90 degrees. We need to rotate the images so that they appear properly. For this article we have used an awesome extension written by Hardy Macia.
Add the following lines inside the createPreviewViewsForFilter method.
Run the application again and you will notice that now the preview filter images are displayed correctly.
The applyGesturesToFilterPreviewImageView is used to apply the single tap gesture to the UIView control. The applyGesturesToFilterPreviewImageView is implemented below:
When the filter preview image is touched then the “applyFilter” method is invoked. The “applyFilter” method is implemented below:
The screenshot below shows the filter applied to the image.


Source Code:
The complete source code for the project is available on Github which can be downloaded using the link below:
https://github.com/azamsharp/TCam
Conclusion:
In this article we demonstrated how to use the power of the Core Image API in iOS 5 to create and apply filters on images. In the next article we will discuss how to share the altered images on Twitter.


