Every application has some sort of form to enter the information. The add form can be a separate page or the same page separated by panels. In this article we will see how we can add a new row in the GridView control by using the GridView footer template.
Every application has some sort of form to enter the information. The add form can be a separate page or the same page separated by panels. In this article we will see how we can add a new row in the GridView control by using the GridView footer template.
Creating the User Interface:
The User Interface is pretty simple. All you have to do is assign a DataSource to the GridView control. In this case my DataSource is a DataSet which is filled using SqlDataAdapter.
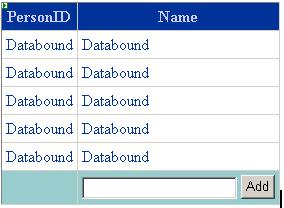
Here is a screen shot of a TextBox added to the footer of the GridView control.
Here is the HTML Source of the GridView control in which you can see that the TextBox is being added in the footer template of the GridView Control. The Button control CommandName property has been given the name "ADD" so that we can catch the event generated in the GridView item events.
| <asp:GridView ID="GridView1" runat="server" BackColor="White" BorderColor="#3366CC" BorderStyle="None" BorderWidth="1px" CellPadding="4" AllowSorting="True" AutoGenerateColumns="False" ShowFooter="True" OnRowCommand="GridView1_RowCommand"> <FooterStyle BackColor="#99CCCC" ForeColor="#003399" /> <RowStyle BackColor="White" ForeColor="#003399" /> <PagerStyle BackColor="#99CCCC" ForeColor="#003399" HorizontalAlign="Left" /> <SelectedRowStyle BackColor="#009999" Font-Bold="True" ForeColor="#CCFF99" /> <HeaderStyle BackColor="#003399" Font-Bold="True" ForeColor="#CCCCFF" /> <Columns> <asp:BoundField DataField="PersonID" HeaderText="PersonID" /> <asp:TemplateField HeaderText="Name"> <ItemTemplate> <asp:Label ID="Label1" Text='<%# Eval("Name") %>' runat="server"></asp:Label> </ItemTemplate> <FooterTemplate> <asp:TextBox ID="txtName" runat="server"></asp:TextBox> <asp:Button ID="Button1" CommandName = "ADD" runat="server" Text="Add" /> </FooterTemplate> </asp:TemplateField> </Columns> </asp:GridView> |
BindData Method:
Let's see the code for the BindData method which is called when there is no postback. The primary purpose of this method is to populate the GridView control.
| private void BindData()
{ string connectionString = ConfigurationManager.ConnectionStrings["ConnectionString"].ConnectionString; SqlConnection myConnection = new SqlConnection(connectionString); SqlDataAdapter ad = new SqlDataAdapter("SELECT * FROM tblPerson", myConnection); DataSet ds = new DataSet(); ad.Fill(ds, "tblPerson"); GridView1.DataSource = ds; GridView1.DataBind(); }
|
Catching the Event Generated by Button Click in the Footer:
As you have already noticed that there is also a Button control inside the Footer of the GridView control. We can easily catch the events and access the TextBox which resides in the Footer.
GridView RowCommand event is generated when ever any event occurs inside the GridView control. This is the best place to catch the Button click event.
| protected void GridView1_RowCommand(object sender, GridViewCommandEventArgs e)
{ // We are checking against the "ADD" if (e.CommandName == "ADD") { string name = ((TextBox) GridView1.FooterRow.FindControl("txtName")).Text; AddNewRecord(name); } } |
Now that we have got the text in the string variable we are ready to insert the new data. The new data is inserted by a small method named AddNewRecord(string name).
| private void AddNewRecord(string name)
{ string connectionString = ConfigurationManager.ConnectionStrings["ConnectionString"].ConnectionString; SqlConnection myConnection = new SqlConnection(connectionString); string query = @"INSERT INTO tblPerson(Name) VALUES(@Name)"; SqlCommand myCommand = new SqlCommand(query, myConnection); myCommand.Parameters.AddWithValue("@Name", name); myConnection.Open(); myCommand.ExecuteNonQuery(); myConnection.Close(); BindData(); }
|
I hope you liked the article, happy coding!